Fiery Foods & BBQ Central Recommendations
Chile Pepper Bedding Plants… over 500 varieties from Cross Country Nurseries, shipping April to early June. Fresh pods ship September and early October. Go here
Chile Pepper Seeds… from all over the world from the Chile Pepper Institute. Go here
Photos by Harald Zoschke
In the protected environment of a greenhouse, cold frame, or indoors under lights, seedlings tend to grow rapidly and produce large cells with thin walls. This “soft growth,” as it’s called, has not prepared the pepper seedling for the rigors of the early spring garden. Its leaves are not accustomed to the strong ultraviolet rays of the sun, its stems are not strong enough to withstand high winds, its roots are not established enough for dry conditions, and the entire plant is subject to low temperature shock. Unless properly conditioned for the outside, pepper seedlings may be sunburned, wind-whipped, and injured by low temperatures or even heavy rains.
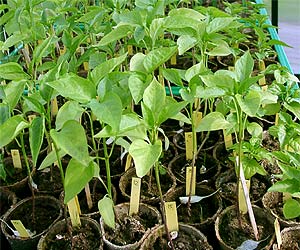
- Seedlings, 6 Weeks after Germination
Hardening Off
The solution to the problem of shock during transplanting is a process called hardening-off, whereby the seedlings are gradually made tough enough for the garden. Technically, hardening-off is a physiological process that adds carbohydrate reserves to the plant and produces additional cuticle on the leaves, reducing water loss. Practically, the process slows plant growth while acclimating the seedling to harsher conditions.
A cold frame works the best for the hardening-off process. The heating cables are turned off and the top is left open for longer periods of time (all night when the temperatures are warm enough), which enables the seedlings to toughen in the sun, wind, and lower temperatures.
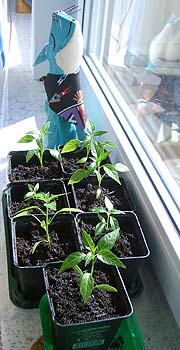
Seedlings getting used to Sunlight
Greenhouse-grown plants, or those grown indoors under lights, are usually taken outside for increasing long periods of time. Starting about two weeks before transplanting or about the date of the average last frost, move the trays outside to a location where they will receive partial sun. Bring them indoors at night, but turn the greenhouse heaters off. Begin with only a few hours a day outside, but as the days go by, increase the amount of sun the seedlings receive and the length of time outdoors until they can be left out all day and night. Reducing the water to seedlings will also “harden” the plants. Allow the seedlings to wilt slightly before watering; after two weeks of this treatment they can be transplanted.
Transplanting
The Garden Layout. By now, the gardener will have already planned the basic design of the garden according to the criteria described in our series Preparing the Pepper Garden. The next decision is where to place the peppers within this design, especially if other crops are being grown. The first consideration is voiced by John Swan, a pepper grower in West Chester, Pennsylvania: “We don’t plant peppers in the same location two years in a row; a plot plan reminds us of what we have planted, when and where, from year to year.” While crop rotation is crucial for commercial growers, it is merely advisable for home gardeners. If compost is added to the garden each year, and there is no sign of disease, peppers can be grown for years in the same locations in the garden.
Many gardening authorities, especially those who favor all-organic techniques, instruct the grower to plant peppers with other “companion plants” that are supposedly “compatible” with them. One book lists basil, carrots, eggplant, onions, parsley, and tomatoes as companion plants for peppers and kohlrabi as a non-compatible plant. Unfortunately, such claims must be relegated to the domain of gardening lore because of the lack of scientific evidence to support them. In some cases, so-called companion plants for peppers, such as tomatoes and eggplants, are closely related and share many of the same diseases and insect pests, so they can hardly be called good companions because one may infect another.
More reasonable is the concept of inter-cropping, where gardeners take into consideration such factors as how fast the various crops mature, the relative heights involved, and the positioning of light-demanding and shade-tolerant plants. For example, a row of shade-tolerant rocoto chile peppers or chiltepins might be planted between two rows of corn.
For cultivating large numbers of peppers, the simplest method is to plant them in elevated rows or in clusters in raised beds. Whatever method is used, remember to label each variety or draw a diagram of the relative position of each variety for later use. It is frustrating to lose track of where you have planted a certain variety, especially in the early stages before the pods have matured.
Buying Transplants. Of course, we recommend that gardeners raise their own transplants from seed, because it is part of the mystique of the garden. But some people will be tempted by the healthy-looking seedlings available from commercial nurseries. The main drawback of nursery-grown transplants is the lack of variety of peppers available in the ones in the gardener’s home town–usually only some bells and perhaps jalapeños and yellow wax peppers. However, some online companies such as Cross Country Nurseries www.chileplants.com have hundreds of varieties available. Also a problem is that some transplants are “forced” with high levels of nitrogen, resulting in tall plants with insufficient root growth. These plants may wilt severely during transplanting.
The opposite problem is too many roots, caused by seedlings that have been growing in cramped containers for too long. It takes longer for potbound seedlings to extend their roots into the garden soil, so they too are subject to wilting until they are established.
Most nurseries indicate that their seedlings are hardened-off and are ready for immediate transplanting. Instead of taking a chance and being disappointed, harden them off yourself for at least a week.
In the Garden. The ideal weather for transplanting is cool temperatures, cloudy skies, and little or no wind. After deciding the layout of the peppers, dig a small hole with a trowel slightly larger than the root ball of the seedling. Holding the seedling by its root ball (never by the stem or leaves if it can be avoided), place the seedling in the hole, fill the rest of the hole with garden soil, press the soil around the root ball and stem, and immediately water it.
Plant spacing depends on a number of factors, including the ultimate size of the varieties being grown. Smaller varieties, such as ornamentals, can be planted closer together than, say, ajís (Capsicum baccatum), which can grow quite large. Arthur Pratt, a professor emeritus at Cornell University, suggests close spacing for peppers, placing them on 1-foot centers. “I do know that pepper plants grow almost twice as tall when they’re tightly spaced,” he told Organic Gardening, “and the there’s usually less sunscald on the fruit because they’re better shaded by the leaves.” Some commercial pepper growers space their plants as closely as four inches apart. Close spacing also helps to keep moisture under the canopy of leaves.
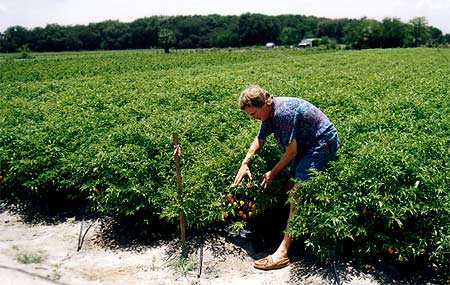
Close plant spacing like on this commercial habanero field in Plant City, Florida also helps to keep moisture under the canopy of leaves. Plus, it gives weeds no chance, helping to avoid herbicides.
Hotcaps. To protect the seedlings from insects, wind and cold temperatures, some gardeners set miniature greenhouses, known as hotcaps, over each seedling. Hotcaps can be purchased at garden stores in the form of waxed paper cones, or they can be fashioned from glass or plastic jugs. The bottoms of the jugs are cut off, and the remainder of the jug is set over the plant and pushed into the soil. The only problem with hotcaps is that on warm, sunny days they can hold so much heat they can cook the seedlings. So, they must be removed during the day and replaced in the early evening.
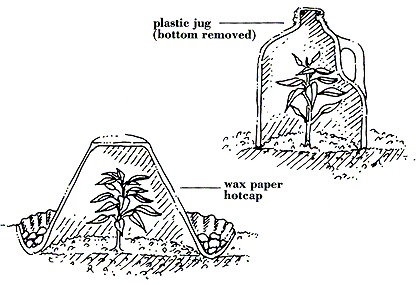
Hotcaps
John and Ann Swan, pepper growers in West Chester, Pennsylvania, cut the bottoms out of six-inch plastic nursery pots and place one around each pepper seedling. “They shelter young seedlings not only from cutworms, but also from stem-whipping winds. The pots reflect and concentrate heat, and gives us a reservoir for watering..” They also cover the plants with three-gallon plastic nursery pots if night temperatures fall too low.
Direct Seeding. One of the most common weeds in the pepper garden is volunteer peppers from the previous year’s fallen pods, which proves that direct seeding works. The technique is mostly used by commercial growers with acres of pepper plants who don’t want to bother with raising transplants.
Direct seeding can be used by the home gardener. However, the technique is not recommended for climates with short growing seasons. The seed should be planted no more than one-half inch below the soil surface, and the row or grouping of peppers should be carefully marked to identify the variety later.

