Fiery Foods & BBQ Central Recommendations
Chile Pepper Bedding Plants… over 500 varieties from Cross Country Nurseries, shipping April to early June. Fresh pods ship September and early October. Go here
Chile Pepper Seeds… from all over the world from the Chile Pepper Institute. Go here
Photos by Harald Zoschke
An ideal pepper-growing environment is one that provides optimum levels of light, heat, moisture, and oxygen. The home gardener has a number of options to choose from, but not all of the environments (cold frames, for example) will keep the seeds warm enough for quick, high-percentage germination. We advise that growers use heating cables under their growing containers in all environments. The plastic-covered cables will keep the soil temperature stable, usually between 70 and 80 degrees F. and are equipped with a thermostat which shuts off the heat when the pre-set temperature is reached. Master gardener Carolyn Esparsen suggests that if cables are not available, simply place the growing containers on top of the refrigerator. Suppliers now offer propagation mats that keep the temperature at 75 degrees, but they are more expensive than cables.
Greenhouses and Window Greenhouses. Heated greenhouses are probably best for starting seeds indoors. Gardeners fortunate enough to have a greenhouse enjoy plenty of diffused sunlight, heat from both solar gain and heaters, humidity from the proximity of other plants, and air circulation from fans. However, greenhouses also have a few drawbacks. Some greenhouses, especially those attached to the north side of a house, have low light duration and levels, causing the pepper seedlings to become leggy and topple over. In this case, the newest growth of the seedlings may need to be pinched back, which causes lateral growth and produces a bushier plant.
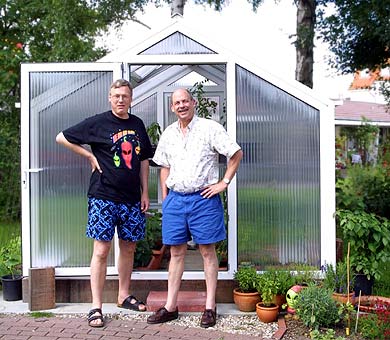
Dave visiting Harald and his Pepper Greenhouse
Some greenhouses, especially south-facing ones, may overheat during the spring and may need shading. Greenhouse supply stores and some nurseries sell shading cloth of various densities. Greenhouses also need adequate air ventilation to avoid problems with damping-off and stem rot (discussed later).
Many gardening books suggest that windows are good places to germinate pepper seed and to grow seedlings, which simply is not true. The amount of available light decreases through the windows as the sun rises higher in the sky and the days approach the summer solstice, resulting in spindly plants. Cats are another problem with window sill cultivation because they are notorious seedling grazers and can quickly ruin the freshly-sprouted crop. Cold drafts at night, and inadequate air circulation during the day also cause problems.
Window greenhouses, which extend outside the house, are much better than window sills because they provide more light. They also cool down at night, so heating cables should be used under the containers. Unfortunately, window greenhouses lack the space to grow large numbers of seedlings and they tend to trap hot air, so they must be well-ventilated. However, if used carefully, they are fine for the gardener raising only a few favorite peppers.
Cold Frames and Hotbeds. Cold frames are the second most efficient environments for growing seedlings and probably the least expensive to construct and operate. There are two types of cold frames: permanent ones, and temporary ones that are dismantled after the seedlings are transplanted.
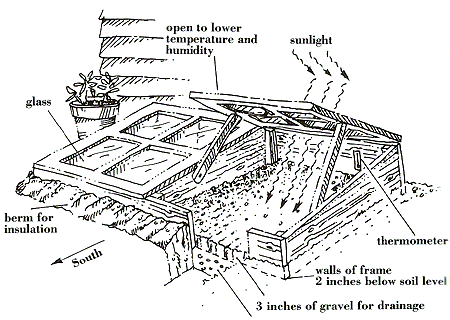
A Cold Frame
A cold frame is a wooden box with a glass, plastic, or fiberglass top. Permanent cold frames can be constructed in various sizes, but about 3 feet wide and 6 feet long is average. However, gardeners should take into consideration that the average tray for six-pack cells measures 11 by 21 inches, so the cold frame should be constructed to accommodate multiples of these measurements or other dimensions of the growing containers.
The top of the cold frame can be made of old window sashes, or a wooden frame covered with fiberglass or plastic film. Some greenhouse supply stores sell portable cold frames or pre-made sashes for cold frames. The top should be hinged so that it can be propped open during the day for ventilation. The cold frame should face south so that the top is angled to best catch the rays of the sun. It should be equipped with a thermometer and heating cables and should be sealed with weather stripping or caulking. Permanent cold frames should have good drainage, and installed heating cables covered with wire screening and sand to insure even heating.
Temporary cold frames can be constructed of cinder blocks sealed with plastic film, or from old lumber that can be knocked apart and stored after use. Either permanent or temporary cold frames can be insulated by mounding a berm of soil or sawdust around the frame. Electric light bulbs can also be installed in cold frames for additional heating.
Hotbeds are simply cold frames with heating cables installed. They are doubly useful because they can quickly germinate seeds and grow seedlings, and then their heat can be turned off so that the seedlings can harden off (see Part 3 of this series). During a typical spring day, the cold frame should be opened when the sun’s first rays strike it in the morning and closed in the late afternoon to retain the heat that has been absorbed inside the cold frame.
Some growers have their cold frames perform double duty in the winter as composting sites. Commonly composted materials such as kitchen vegetable scraps, rabbit manure, and other organic material is placed in the cold frame. Despite the cold outside temperatures, the solar gain in the cold frame causes the material to compost over the winter months, and it’s ready for spring planting.
Artificial Light. Some indoor gardeners do not even have an outdoor garden but rather raise their peppers from seedlings to fruiting plants in containers under artificial light. Outdoor gardeners without either a greenhouse or cold frame can successfully germinate seeds and grow seedlings under fluorescent lights.
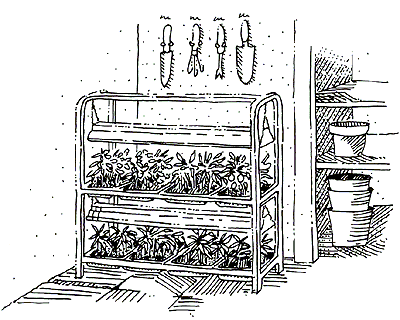
A Fluorescent Light stand for Seedlings
All that’s needed are one or two 4-foot long fluorescent fixtures mounted on a stand or hung from the rod in a spare closet. Mail order companies and retail shops sell a number of models of light stands on wheels. Any cool-white fluorescent bulb will work. The containers are placed beneath the lights so that when the seedlings germinate, they are only a few inches from the bulbs. The fluorescent bulbs will warm the containers, but will not burn the tender foliage. The inverse square law applies here; doubling the distance between the bulbs and the plants results in only one-quarter of the amount of light reaching the foliage. Bulbs placed too far from the seedlings will cause spindly plants.
Seedlings should grow well under artificial light, but they may become leggy and then need to be pinched back. Also, they are tempting targets for cats or pet birds to munch on. These seedlings will be more tender than those grown in a greenhouse or cold frame, and may need a more careful process of hardening-off, as they will be more susceptible to sunburn and wind damage.
Seedling Containers and Growing Media
Every pepper gardener has his or her own preference for the soil mixture and containers for raising seedlings. The soil mixtures range from commercial potting mixtures to garden soil to various blends of organic and inorganic materials. The containers vary from plastic six-pack cells to peat pots to clay pots. Some companies sell propagation systems that combine the elements of a cover, an insulated growing tray, capillary matting, and a water reservoir.
The key is to find the best mixture and containers for the environment in which the seedlings will sprout. For example, the combination of a peat pot and a loose mix might work well in humid areas, but could dry out too quickly in arid environments.
Containers. Factors to consider when choosing containers include: seedling number for each pepper variety that will be sprouted, the size of seedling when they are transplanted, and whether a one-step or two-step method will be used. In a one-step method, seedlings are usually raised in a peat pot or a cube of biodegradable materials that will disintegrate in the garden. In a two-step method, the seedlings grow in six-pack cells until they have reached the 4 to 5 leaf stage, then are transplanted into larger pots, and from there set in the garden.

Home gardeners who only grow about two plants each of about five varieties will not have space problems, so they might as well plant seeds in 6-inch or larger plastic pots or peat pots and thin them to one plant per pot. Six-pack cells in plastic trays are by far the easiest and most space-effective containers to use when growing large quantities of many varieties of peppers.
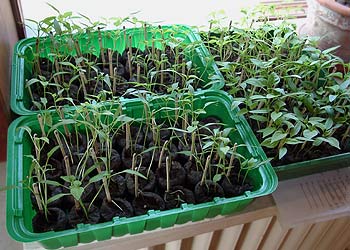
Germination Containers
One drawback of the cell-packs is that the roots of the seedlings sometimes become cramped and start circling the inside of each cell. Root cramping sets back the seedling if the rots are not gently untangled. A root continues to grow in the direction it is set in the ground, so one that is not pointed outward will not grow out. Two more drawbacks should be noted. Root-bound plants tend to dry out and need water more often, and sometimes vigorously growing seedlings compete for sunlight as they bush out. The obvious solution here is to transplant cramped seedlings into larger containers.nurseries use a slightly different two-step process; the seeds are germinated in open flats and the tender, two-leafed seedlings are transplanted into the cell-packs after a couple of days. This method insures maximum utilization of the cell-packs and avoids empty cells from non-germinating seeds.
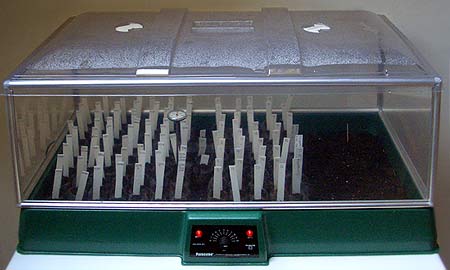
Harald’s setup includes a heated, thermostate-controlled grow-box (propagator) with an aluminium framed top, so plants won’t hit the “roof” too quickly. A soil thermometer helps adjusting the temperature. The lid, which can be lifted off for easy access, incorporates two adjustable vents.
Growing Media. The perfect germination and seedling growing medium has good drainage and aeration, but also some moisture retention. The medium should promote rapid root expansion, which produces vigorous seedling foliage growth. The particles of the medium should be fairly large so that the medium does not pack together and allows the roots easy penetration. Dense or clay soils are the worst possible seedling growing media because the roots are drowned in water and receive no oxygen.
Although some growers believe that peppers should be germinated in the soil in which they will eventually live, we do not recommend using garden soil. It is usually too dense for the tender plants and may contain disease-bearing organisms. Gardeners who insist on using garden soil should sterilize it by baking it for at least an hour in the oven at 350 degrees F. Then it should be mixed half and half with soil expanders such as perlite or vermiculite.
A number of commercial media are on the market, notably Jiffy Mix and Pro-Mix, which are usually combinations of milled peat moss or sphagnum moss, fine vermiculite, and fertilizer. These pasteurized mixtures work well in most situations, but sometimes are unavailable to the home gardener. In that case, the grower can prepare a custom seedling medium by mixing together readily available materials which meet the criteria of drainage, moisture retention, and aeration. We use commercial, sterile potting soil, perlite, and vermiculite mixed in equal proportions for our medium. Coarse sand can be substituted for the perlite, but never use builder’s sand (too fine) or ocean beach sand (too salty). Peat moss is difficult to wet, is too acid, and compacts badly, so use it sparingly. Potting soil and vermiculite hold moisture and nutrients, and the perlite prevents compaction, aids in drainage and aeration, and promotes root growth.
A Suggested Seedling Propagation Technique
We use the following technique to grow seedlings for transplanting with excellent results. Although we use it in semi-arid New Mexico, it should work equally well in other parts of the country. We use greenhouses for our growing environment.
About 8 weeks before transplanting, prepare 6-pack cells by filling them with the suggested growing medium, and place the cells in the plastic trays. Place the trays on the heating cables and plug in the cables. Water the cells with a diluted solution of 20-20-20 fertilizer (1/2 teaspoon in 1 gallon of water) or a slow-release fertilizer like 10-10-10 because the medium has virtually no nutrients.
Select the seeds according to the criteria above and use a pre-planting treatment if you wish. With a stick or the eraser end of a pencil, punch a hole in each cell 1/4-inch deep. Drop two or three seeds in each hole, then cover them with the planting medium. In each six-pack, insert a plastic tag with the variety name and the date marked on it in permanent ink or pencil. Some growers keep a journal in which they record the variety name, date, number of seeds planted, and later, the germination percentage and other notes on the progress of each variety.
When the seeds sprout, cull all but the most vigorous seedlings from each cell by clipping them at the base with scissors. Gently water the cells from the top and make certain the cells are kept moist, but do not allow water to sit in the trays and keep the mixture soggy. If the seedlings are stressed at all by drying out or wilting, it will be difficult if not impossible to revive their normal growth. Make certain there is adequate ventilation and air circulation in the growing enviroment. Fertilize the cell-packs once a week with the same mixture described above.
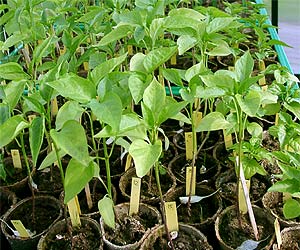
Seedlings, 6 Weeks after Germination
In a heated greenhouse, the heating cables can be turned off after the seeds have sprouted. But, in a cold frame where the only heat is from the cables, the cables should be kept on until the nighttime temperatures warm above freezing.
Cigarette smokers should wash their hands with a strong soap or with rubbing alcohol before touching the seeds or seedlings. The tobacco in cigarettes may contain tobacco mosaic virus which can infect the pepper seeds or plants.
Seedling Pests and Diseases
The same friendly environment that promotes seedling growth also provides perfect breeding conditions for common greenhouse pests such as aphids, white flies, mealy bugs, and spider mites. Aphids are probably the most common insect pest that attacks seedlings. Although spraying with dilute nicotine sulfate or diazanon solutions will kill them, it is not the best solution to the problem because the chemicals can burn the leaves and stems of the seedling, thus inhibiting growth. A non-toxic method is to wash the aphids off the seedlings every day with a stream of water. This procedure is labor-intensive, but it works. Another method is to spray the seedlings with a solution of Ivory soap or Safe’s Insecticidal Soap.
Mealy bugs are soft-bodied insects that look like pieces of white fluff. They do not move around much, but once they are established they can suck plenty of sap out of pepper plants. The least toxic way to kill them is to touch them with a swab dipped in isopropyl alcohol.
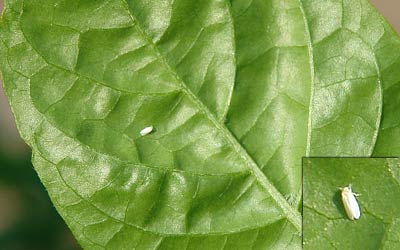
White Flies
Whiteflies, another common greenhouse pest, are more difficult to kill because they are so mobile. They can be controlled, but probably not eliminated, by closing up the greenhouse and fumigating it by spraying a flying insect insecticide. The greenhouse should be closed up for ten minutes, then ventilated. Also useful are the yellow, sticky cards that attract the flies and trap them.
By far the most difficult pests to control are spider mites, barely visible eight-legged arachnids that build small webs on the underside of leaves and thus are hard to spot. They can be controlled by spraying the underside of pepper leaves with insecticidal soap or Diazanon, according to the manufacturer’s instructions. We always prefer mechanical removal of pests by water spraying or gentle scraping rather than the application of chemical insecticides.
The most devastating problem of the humid greenhouse is damping-off, a fungal disease that causes the stem base to rot and the seedling to topple over. Damping-off can quickly wipe out an entire greenhouse of seedlings. The disease proliferates in still, very moist air, so the first line of defense is good air circulation. In humid growing environments, an extra fan in the greenhouse to blow air around is a necessity. The seedlings also can be treated with the fungicide Benomyl according to the manufacturer’s instructions.

