Story and Photos by Harald Zoschke
Recipes:
-
Candying Chiles
-
Bold Banana Bread
-
Belligerent Butter Scotch
-
Blistering Blue Lagoon Cocktail
Many chile gardeners know harvest time as “too many chiles”, and we already showed you various ways to use and preserve the plenty of pods, for example by drying, pickling, or juicing. Now here’s a new way to keep the pods for enjoying all year long: Candied Chiles! The ways you can use the sweet peppers are almost limitless, and the same is true for a byproduct of the process, spicy syrup.
![]() An Ancient Tradition
An Ancient Tradition
Candying is one of the most ancient forms of preserving the harvest – the ancient Egyptians preserved nuts and fruits with honey. Like spice, candied fruit like wild oranges, melons and apricots, were brought to Europe by traders from the Middle East and China in the Early Middle Ages. Until sugar was introduced during the Crusades, honey and palm syrup were used, later replaced mostly by sugar-based syrup. The technique is the same, though – by placing fruit in syrup with gradually increased sugar content, their cell liquid is getting replaced by sugar. This migration through semi-permeable cell walls is called osmosis, not to be confused with Ozzmosis, the great ’95 album by Ozzy Osbourne. Typically, 70 to 75 percent of the extracted cell liquid, mostly water, will be replaced by sugar, while shape, color and a good portion of the flavor will be preserved. That way, candied fruit will keep almost indefinitely.
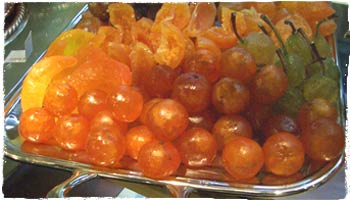
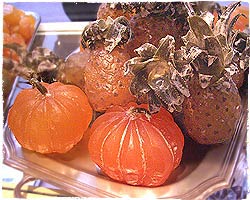
Since its introduction to Europe in the Middle Ages, the technique was getting refined to perfection especially in France and Italy. In fact, these countries have true artists even today. At a confectioner’s store in Biarritz, France, we discovered these beautiful candied fruits – oranges, pears, melons, even whole pineapple.
|
|
Candied fruit at a confectioner’s |
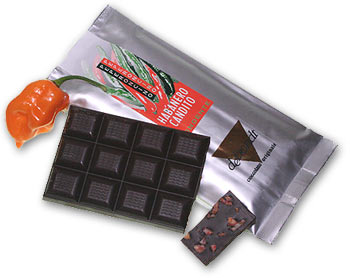
At the Peperoncino Festival 2006 in Southern Italy, we discovered a great dark chocolate from Tuscany that was nicely spiced with bits of candied habanero peppers!
|
“Habanero Candito”
|
|
This was the ultimate motivation to try candying ourselves – chiles, of course. We heard from other chileheads who already had successfully candied chiles, so we rolled up our sleeves (so they wouldn’t get sticky.)
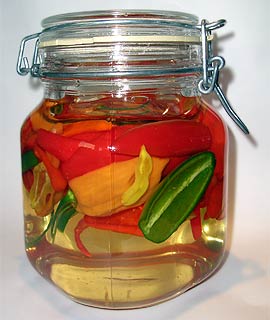
As you can see below, our efforts were not in vain. In fact, the chiles look and taste just great, and we’ve already found many uses for them.
|
|
Home-made Candied Chiles:
|
Be warned, though – candying chiles is not for the impatient. The process spreads over six days, taking about 30 minutes every day, not counting cleanup of sticky utensils and pots. While the sophisticated approach of French confectioners aims for soft fruit, we’re aiming for crunchy chiles with a transparent, almost glass-like appearance, so we can take a simpler approach. Let’s get started!
![]() Required Equipment
Required Equipment
-
Medium sized saucepan
-
Wooden spoon
-
Mason Jar (1 quart/1 liter) or similar glass container with lid
-
Small glass bowl that just fits into the opening of the jar, to hold down the
peppers in the liquid -
one or two clean marmalade jars, lids
-
Heat resistant strainer
-
1/2 quart (1/2 liter) jars (for example jam jars) to keep excess syrup
-
Cookie cooling rack
-
Baking oven or electric dehydrator
-
Old newspapers to put under pots and jars
![]() Ingredients
Ingredients
-
About 1/2 to 3/4 lb. (250 to 340 grams) of fresh chile pods,
rinsed and cut in half or strips (see note below) -
2.6 lbs.(1,2 kilograms) regular white sugar
-
1 Quart (1 liter) water
Day #1
1. Preparing the Peppers
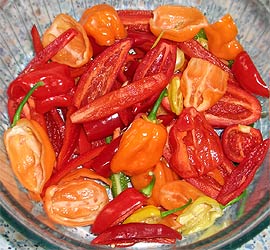
Like with all preserving techniques, only the freshest, spotless chiles should be used. These are rinsed and patted dry.
|
|
Peppers ready for Candying
|
To ease syrup penetration, it is recommended to cut the pods in half. You should also deseed them. Just cutting the pods in half works well for thin-walled varieties like Habanero, Cayenne or Thai. Fleshier chiles like Jalapeño are better cut into strips. See also our Tips Section below.
2. Cooking the Syrup
In a large saucepan, combine 1 quart (1 liter) water and 2 lbs (1 kilogram) sugar. Using the wooden spoon, mix well, then bring to a rolling boil. Keep boiling and stirring until the mixture takes on a syrupy consistency, but still stays clear and colorless. This takes about 30 Minutes. If you are using a ceramics stovetop, watch out not to spill any sugar or sirup on it, as this stuff burns in fast.
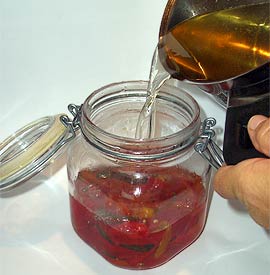
Put the cut chiles into the Mason jar or other glass container, pour with boiling-hot syrup (caution – don’t burn yourself). Leave enough room to put a small bowl as a weight on top to keep the peppers down, all covered with in the liquid. Close the container, keep remaining syrup in marmalade jar(s).
|
|
Pouring the Syrup
|
Let chiles sit in the closed container for 24 hours.
|
|
Don’t they look beautiful?
|
Notes:
-
To minimize spill cleanup, put a newspaper underneath your jars. It is also recommended to rinse and clean all cooking utensils right after work.
-
Various candying instructions recommend to start the pouring with syrup that has cooled down first. We found pouring the piping hot liquid helps avoiding spoilage of peppers by fermentation while sitting in the liquid for days. Of course we could have boiled the pods quickly first, but that might have made them soft and mushy, losing their shape. Feel free to experiment here.
Day #2
Drain chiles in a strainer, letting the syrup flow into your saucepan. Put chiles back into the glass container.
|
|
Straining the Chiles
|
Bring the syrup to a boil and stir in an additional 50 g (1.75 oz.) of sugar. Add also the syrup you saved in marmalade jars, keep boiling and stirring with your wooden spoon for about 10 minutes at high heat. Pour the hot syrup over the chiles again, put on the weight to keep them all covered in liquid. Also, save the remaining syrup again, let chiles sit in their closed container for another 24 hours.
Day #3 to Day #5
Repeat the second day’s procedure, including the addition of 50 g (1.75 oz.) more sugar every day. Both the sugar addition and the reduction by cooking will cause the syrup to become thicker and thicker. And it’s getting hotter, too, as some of the capsaicin dissolves from the peppers into the liquid. After Day #5, let sit for 48 hours and have a rest on Day #6.
Day #7
Pour syrup and chilis into saucepan and bring to a brief boil, for just one minute, then take off the heat.
Drain chiles through strainer, catch the syrup in jars – you’ll see we have great uses for the sticky spicy liquid as well.
|
|
Draining the Syrup off the Chiles
|
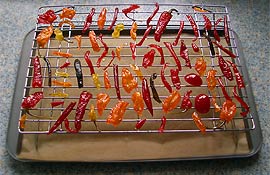
Arrange the chiles on a cookie cooling grid or a grid from your baking oven. Be sure to put parchment paper or a newspaper underneath, as we put the peppers there to let them drip off excess syrup. Count for two hours.
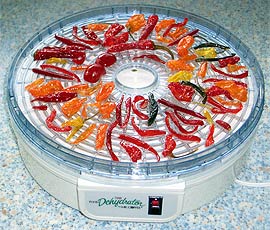
As the pieces will still be sticky, we finish them off in the baking oven or dehydrator. Since I kept my good old trusty El Cheapo “Mr. Coffee” dehydrator from our time living in Florida, I used that one, and the chiles were nice and dry after just four hours. When using a baking oven, dying should take about 15 minutes at 210F (100°C) to 300F (150°C) with a door lightly open. If available, turn on the ovens’s air, too. Check after 10 minutes, drying should be finished no later than another 10-15 minutes. (To keep the peppers as they are, we prefer the airflow and lower temperature offered by a dehydrator, which is a great device for drying peppers in general).
|
|
Finishing in the Dehydrator
|
Either way you should let the chiles cool to room temperature, then store them in an airtight container. Flat containers like Tupperware or Gladware allow to place the pieces side by side, rather than stacking them, and potentially have them stick together.
|
|
Airtight Storage
|
That’s because it can be possible that the chiles are still a little sticky. If that’s the case, you can coat them with powdered sugar (also called confectioners’ sugar). The French confectioners glaze their fancy fruits with a thin sugar coating after candying to keep them soft and moist by preventing drying out more than desired. But since we aimed at producing crunchy chiles to begin with, we don’t need to do that. Our candied chiles didn’t stick after weeks of storage, and they wonderfully kept shape, color, heat and aroma. I think the pictures speak for themselves!
To retain the candied fruits’ colors, commercial production sometimes involves the addition of sulphur dioxide, a legal additive. Store your candied chiles at a dar place, they should keep their colors nicely without any additives. Especially the colors of mature pods survice syrup treatment and cooking really well. In fact, they seem to come out even more vibrant on the translucent pods. Just the green color of immature pods tends to darken to a brownish tint during candying.
Note: We found it to be very important to get rid of all humidity and to store the candied peppers tightly closed at a cool place, preferably in the refrigerator. Especially fleshy peppers can get moldy after a coiple of months if not dried well and/or sored too warm. Since the thin-fleshed varieties are getting dry more easily, we found small hot red peppers as well as c.chinense varieties like Habanero, Tropical Red, etc. best suited for candying.
Now let’s see what we can do with our beautiful candied chiles – and with the hot syrup!
![]() How to Use the Candied Chiles
How to Use the Candied Chiles

-
Spice up fruitcake, muffins and other cakes, like our
Bold Banana Bread (see recipe below) or how about
a habanero cheese cake (above), with bits in the dough
and matching decoration on top! -
Decorate cakes, ice cream and other desserts
-
Use as a spicy snack (optionally cover with chocolate – yum!)
![]() What to Do with the Spicy Syrup
What to Do with the Spicy Syrup
The hot & spicy syrup is a nice byproduct that can be used in many ways as well. Here are some ideas.
|
|
Spicy Syrup: The byproduct can
|
-
To sweeten tea and hot chocolate, especially during the cold season
-
For cocktails that call for syrup as an ingredient, like Blue Lagoon (see recipe)
-
Over waffles and pancakes — makes U hop 😉
-
Spicy toffee, caramels, or our Belligerent Butter Scotch ( see recipe below)
-
For lingering lollipops
The syrup is stored best in marmalade or Mason jars. Strain to keep out seeds and chile particles from candying
![]() Tasty Tips
Tasty Tips
-
These chiles can be candied–just cut into halves:
Aji Amarillo, Andy and other Cayenne varieties, Apple Sweet Pimiento, Caribbean Red, Cascabel, Cherry Bomb, Datil, De Arbol, Dutch Red, Habanero, Malagueta, Peter Pepper, Piquin (Pequin), Red Savina, Scotch Bonnet, Serrano, Super Chili, Tabasco, Thai, Birdeye. (The pea-sized Chiltepins are probably candied best in whole, punctuated with a neeedle. That one is in the works right now.)
-
These meatier varieties are better cut into strips or rings:
Antohi Romanian, Biscayne and other Cubanelle type peppers, Feher, Hungarian Hot Wax, Italia, Jalapeno, Manzano (Rocoto), New Mexicans like Ortega, Anaheim, Joe Parker, Paprika Supreme, Poblano, Rio Grande, Rocoto, Round of Hungary, Santa Fe Grande.
-
If you wish to have soft sweet chiles, just leave them in the syrup. Whenever needed, you can fish them out of the jar. That’s almost like Peperoncini Giulebbati, candied sweet hot chiles that are great on cheese. We found those on an Open Doors chile event in Parma, Italy, presented by Maurizio from Ca’ d’Alfieri (see our report)
-
Still have one of those 70’s Bodum “French Press” low-tech coffee makers? These devices are great for candying chiles, as they provide great means to keep the pods submerged in the syrup.
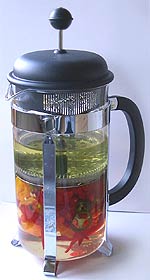 Great for Candying: “Bodum” Coffee Maker
-
Keep sections of pods uniform in size for each batch.
-
Procedure and recipes are not carved in stone — experiment!
-
Most importantly, take your time and allow this to be a fun project.
-
Do you have any further ideas how to use candied chiles (and the syrup) that
you would like to share? We’d love to hear from you!
Happy Chile Candying!!
![]() Recipes
Recipes
Bold Banana Bread
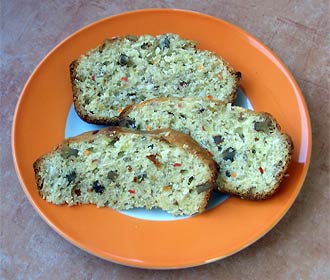
Credit for this tasty recipe goes to Mary Jane, who baked this banana bread on one of our visits to Albuquerque. While MJ used a chopped fresh habanero, I replaced it with a colorful mix of chopped candied peppers, making it almost look like a fruit cake.
-
1 3/4 cups all-purpose flour
-
2 1/4 teaspoons baking powder
-
1/2 teaspoon salt
-
1/3 cup shortening (we prefer butter)
-
2/3 cup sugar
-
1/2 teaspoon lemon zest
-
2 eggs
-
2 soft, ripe bananas
-
1/2 cup chopped walnuts or pecans
-
1 cup coconut flakes
-
1 tablespoon mixed candied chiles, chopped
Note: All ingredients should be at room temperature.
-
Preheat oven to 350F (180°C)
-
Sift flour with baking powder and salt.
-
Blend shortening, sugar and lemon zest to a creamy consistency.
-
Beat the eggs, mash the bananas, blend both well with the shortening/sugar mixture.
-
Add the sifted ingredients in three steps, beating the batter after each addition until smooth.
-
Fold in the chopped nuts, candied chiles and coconut flakes.
-
Pour banana nut bread batter into a well-greased loaf pan.
-
Bake for about 1 hour, or until a toothpick inserted in the center comes out clean.
-
Let cool before slicing.
Yield: One loaf
Heat Scale: Mild (punctuated by hot pepper bits)
Belligerent Butter Scotch
This candy recipe makes good use of the syrup created as a byproduct when making candied chiles. Depending on the chiles used, the syrup can get pretty hot. Typically it has a consistency somewhere between corn syrup and molasses and looks clear, lightly tinted.
-
1/2 cup chile syrup
-
1/2 cup butter (125 grams)
-
2 oz. (60 grams) pecans, walnuts or almonds, chopped
-
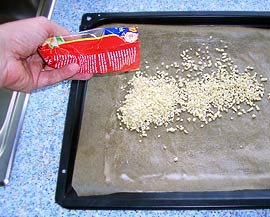
Butter a baking sheet or a piece of parchment paper. Cover an area as large as a letter size page with the chopped nuts and set aside.
-
In a microwaveable cup, cautiously warm butter so it just melts to a liquid stage.

-
Put syrup in a one quart saucepan. Place over high heat and stir with a wooden spoon until it comes to a boil. Continue stirring until the syrup begins to thicken and turns a little darker. Insert a candy thermometer if available.
-
Slowly pour the butter into the saucepan, keep stirring.
Attention: This stuff is getting very hot, and if working on a ceramic stovetop, be sure not to splash any of the sugar.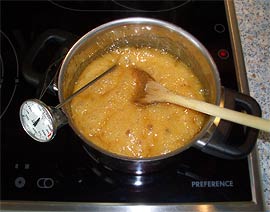
-
Keep at a bubbly boil and keep on stirring – ignore phone calls and the door bell, this stuff burns easily!
-
Remove from heat when the candy thermometer indicates what candymakers call soft-crack stage, about 270F (130°C), or if the mixture changes its color to light brown, whatever comes first (any longer, and the mix will burn).
-
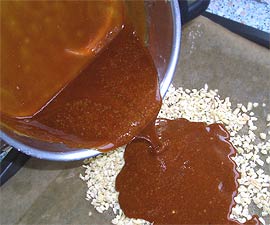
Pour over the chopped nuts and let cool for a couple of hours (optionally, spread chopped nuts also on top, after about 15 minutes).
-
Crack into 1/2″ pieces, store in airtight container and enjoy!
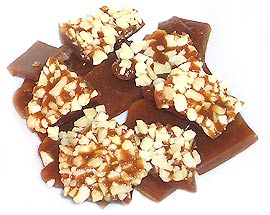
At lower temperatures, the candies would stay chewy. But as I don’t want to pull my crowns, I prefer mine crunchy…
Of course there are plenty of toffee and caramel recipes around – just experiment, using your spicy chile syrup instead of corn syrup and sugar.
Yield: 10 oz.
Heat Scale: Medium (depending on heat of syrup. Hot if pure habanero syrup)
Blistering Blue Lagoon Cocktail
Here’s our kicked-up version of this classic Caribbean cocktail.
-
2 oz. vodka
-
1/2 oz. Blue Curacao
-
1/4 oz. lemon juice
-
2 oz. pineapple juice
-
1/2 oz. chile syrup
-
1 oz. Cpt. Morgan’s Coconut Rum
-
candied habanero chile half
-
crushed ice
-
Blend liquors, juices, and syrup in a blender.
-
Fill two 12-ounce glasses with crushed ice and pour blended liquid over ice.
-
Garnish with candied habanero chile, serve with straws.
-
Be happy.
Yield: 2 servings
Heat Scale: Medium (depending on heat of syrup)
Here are other articles about cooking with sweet heat:
Pomegranate Passion by Lois Manno, with recipes for Asian Shrimp Salsa with Pomegranate Vinaigrette and Wonton Chips, Pomegranate Chicken, PAMAgranite Barbecued Salmon, Lamb Fesenjan with Pomegranate-Walnut Sauce, Roast Duck Breasts with Pomegranate-Chile Sauce, and Creamy Cheesecake with Pomegranate Sauce
Mulberry Madness! by Dave DeWitt, with recipes for Sweet-Hot Mulberry Jam, Chicken with Chipotle-Mulberry Barbecue Sauce, Grilled Lamb Chops with Mulberry Salsa, Country Cobbler, and Mulberry Ice Cream
Chiles and Chocolate by Dave DeWitt, with recipes for The Great Montezuma Hot Chocolate, Double Trouble Chocolate Truffles, Tangy Truffles!, White Chocolate Ancho Chile Ice Cream, Warm Chocolate Pecan Pie, and Chocolate Red Chile Zucchini Cake
Sweet Heat for Your Valentine by Nancy Gerlach, with recipes for Cascabel Caramel Turtles, Peppery Popcorn Candy, Habanero Cashew Brittle, Rum Raisin Red Chile Truffles, and Chocolate Chile Almond Cookies


